
Introduction
If you’ve ever experimented with ComfyUI or other diffusion-based tools like Stable Diffusion, you’ve likely encountered the term Scheduler in the sampling process. While most users focus on prompts, seeds, or samplers like Euler or DPM++, the scheduler quietly plays one of the most critical roles in shaping the final image.
In this guide, we’ll break down what schedulers are, how they work, and how different scheduler types influence the quality, style, and stability of your generated images. By the end, you’ll have a clear understanding of which scheduler to use for your specific creative goals.
What Exactly Is a Scheduler?
A scheduler controls how noise is added and removed at each step of the diffusion process. When generating an image, diffusion models start from pure noise and gradually denoise it to reach a clean, detailed result.
Think of it like a sculptor chipping away at a block of marble. The scheduler decides how much to chip off at each step — too fast and you lose detail; too slow and you waste time or over-smooth the image.
In short:
The scheduler defines the denoising path — how fast, how smooth, and how detailed your image becomes.
How Schedulers Work in Diffusion
Each sampling step involves predicting and removing noise based on a mathematical function. The scheduler curve defines how much noise remains at each step.
Different schedulers define different noise decay curves — this directly impacts texture, contrast, and realism.
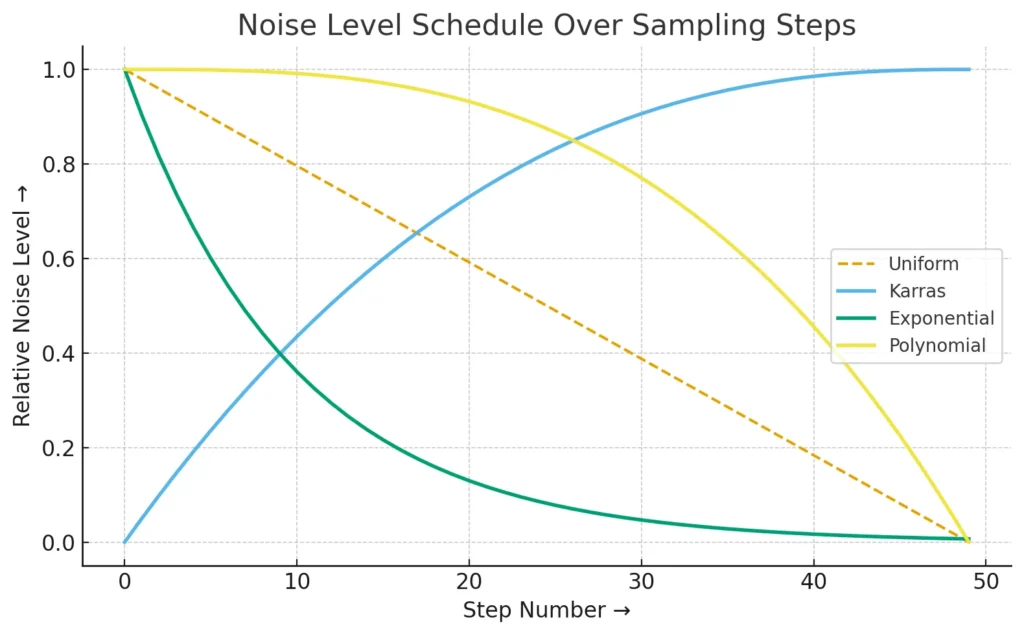
Below is a simplified graph showing how common schedulers handle noise across 50 sampling steps:
Noise Decay Curves
| Scheduler | Description |
| Uniform | Reduces noise evenly over time. Fast but less refined. |
| Karras | Uses small steps near the end for high detail and smoother transitions. Excellent for photorealism. |
| Exponential | Removes most noise early; can produce high-contrast or stylized results but may lose subtle details. |
| Polynomial | Balanced reduction curve, ideal for general-purpose image generation. |
Scheduler vs Sampler
While both sound similar, they play different roles:
| Component | Role |
| Sampler | Defines the algorithm that interprets the model’s noise predictions (e.g., Euler, DPM++, Heun). |
| Scheduler | Defines how the noise level changes across steps (e.g., Karras, Uniform, Exponential). |
You can mix and match these — for instance: – Euler + Karras → Sharp and detailed results. – DPM++ 2M + Uniform → Clean, balanced images. – Heun + Exponential → Stylized, contrast-heavy look.
Visualizing the Denoising Journey
Here’s a conceptual diagram to help you visualize what’s happening:
Noise Level ↑
│ ▓▓▓▓▓▓▓▓▓▓▓▓▓▓▓▓▓▓▓▓▓▓▓▓▓▓▓▓▓▓▓▓▓▓▓▓▓▓▓▓▓▓▓▓▓▓▓▓▓▓▓▓
│ ▓▓▓▓▓▓▓▓▓▓▓▓▓▓▓▓▓▓▓▓▓▓▓▓▓▓▓▓▓▓▓▓▓▓▓▓▓▓▓▓
│ ▓▓▓▓▓▓▓▓▓▓▓▓▓▓▓▓▓▓▓▓▓▓▓▓▓▓▓▓▓▓
│ ▓▓▓▓▓▓▓▓▓▓▓▓▓▓▓▓▓▓▓▓▓▓
│ ▓▓▓▓▓▓▓▓▓▓▓▓▓▓
└────────────────────────────────────────────→ Steps →
Each row represents a scheduler’s trajectory through noise space. The more refined the curve, the more detail your image retains by the final step.
Choosing the Right Scheduler for Your Workflow
| Goal | Recommended Scheduler |
| Speed (quick previews) | Uniform or Exponential |
| Detail and realism | Karras |
| Stylized or contrasty art | Exponential or Poly |
| Balanced general use | Polynomial |
⚡ Pro Tip for ComfyUI Users
In ComfyUI, the scheduler is part of the KSampler node. You can tweak both the Sampler and Scheduler together to optimize output. Small changes — like switching from Uniform to Karras — can significantly improve sharpness and texture without altering the prompt.
To experiment: 1. Open your KSampler node. 2. Try switching between scheduler types. 3. Observe changes in contrast, detail, and consistency.
💡 Final Thoughts
Schedulers are the silent architects of diffusion — they define how your image evolves from chaos to clarity. Once you start understanding how these noise curves behave, you’ll gain much more control over your creative output.
So next time your image looks slightly too smooth, too grainy, or just not quite right, remember: it might not be the prompt — it might be your scheduler.
🧩 Bonus Tip: Combine your favorite scheduler (like Karras) with a strong sampler (like DPM++ 2M SDE) for professional-grade, high-detail outputs in ComfyUI.
Example Visual Comparison
Below is an example (you can recreate it in ComfyUI) showing the same prompt with different schedulers:
| Scheduler | Result |
| Uniform | Fast, slightly rough image with less refined edges |
| Karras | Smooth gradients, high detail, realistic textures |
| Exponential | High contrast, stylized feel |
| Polynomial | Balanced, natural look |
🖋️ Conclusion
The scheduler is often overlooked, yet it’s a vital part of achieving the image quality you desire. Whether you’re optimizing for speed, detail, or artistic flair, understanding schedulers allows you to unlock the true creative potential of ComfyUI.